
- Download the ProVision CAM 2 App.
- Once open, click the circle showing you've read the Privacy Agreement and then hit Accept.
- The app will prompt you to give it permissions. You can choose what you prefer to allow. (Location or notifications) *This may look different depending on the phone you use.
- When you see this screen, just hit skip as we will be connecting you to your cameras in an easier way.
- Once again you can hit the Skip button in the top right corner.
- You'll find an empty server list. From here you can click on the circle with 3 dots inside it. (Top right corner)
- If you have access to the QR Code press the “Scan code to add button”. (Second option in the drop-down menu). If you have the device serial number, press "Add Manually" (First option) and skip step 8.
- You'll then be prompted to take a photo of the QR Code on the top of your recorder. (Found in the front right corner) Tip: If you are having trouble scanning the QR Code, make sure it's bright enough for the camera to see clearly.
- After scanning, fill in your information. You can change the name DeviceName1 to whatever you prefer. Enter your username and password. *Make sure to hit save at the bottom of your screen. (If you are using add manually, also input the Device ID under "Device ID"
- You should now have your system linked. If you see the signal bars on the right highlighted in green, your system is online. Below you will see some more information about the service list options.
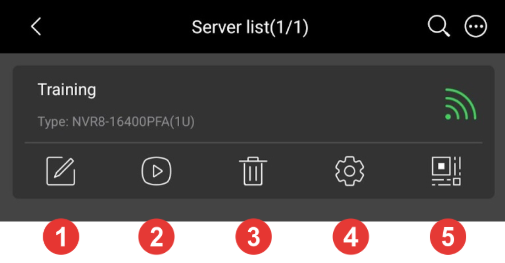
- Allow you to edit the same information you just put in or if you put your information in incorrectly and need to re-enter it (Wifi bars would show red)
- The play button brings you to your live cameras. Tip: If you don't see your cameras, try pressing this button.
- This is the trash can, lets you delete the cameras and all the information.
- This is your settings, you can change your password in this menu.
- This is a virtual QR Code, you can click on this to reveal a larger QR Code that you can scan to add other devices instead of using the recorder
.png)


